This recipe is the very first I used to make bread, and one I still use today. No fancy machine, no crazy complicated steps or ingredients… Just a bit of patience, an oven and your hands! I do use a stand mixer to go faster now, but i started without it. I discovered the base recipe by accident (it is from Joy) and I needed it in French to share with my family, and to share a few tips. You can now skip the expensive « old fashioned bread » from the bakery! / Cette recette est la toute première que j’ai utilisée pour faire du pain, et que j’utilise encore aujourd’hui. Pas de machine fantaisiste, pas d’étapes ou d’ingrédients compliqués… Juste un peu de patience, un four et vos mains ! J’utilise un mixer aujourd’hui pour aller plus vite, mais j’ai commencé sans. J’ai découvert cette recette par hasard, et j’en avais besoin en français pour la partager avec ma famille, et pour partager mes petits trucs. Vous pouvez maintenant vous passer du coûteux « pain à l’ancienne » de la boulangerie!
English
Ingredients
- Plain flour (you will measure it with the mug listed below)
- 1 sachet of active dry yeast
- Salt
- Water
- If you feel like it : nuts, seeds, or dried fruits
Tools:
- 1 big bowl to mix
- 1 regular mug
- 1 oven-proof dish
- make sure your oven has a baking sheet + another one or a rack (we’ll need to put the bread and the dish in it)
Preparation and bake time total: 2 hours 45 minutes.
Gather all the ingredients, the mug and the bowl. Fill your mug with flour, without packing it in tightly, just fill it naturally. Throw this flour into your bowl and then another one, and then half a mug. You want to have 2 ½ mugs worth of flour.
Then add in your yeast, into the flour dry. Nevermind the instructions ont the package. Next put salt at the bottom of your mug, just enough to cover the bottom (should be less than half a teaspoon for a regular mug). Throw that into the bowl too, and quickly blend it together with your fingers.
Next, fill your mug with slightly warm water (NOT boiling!) once and pour it into the mix. You now have a ratio of 2 ½ dry ingredients + 1 mug of water : the perfect ratio for your dough.
If you want, you can now add more fancy ingredients like seeds, nuts or dried fruits.
Next start to mix the preparation togetherwith your hands. If you a re lazy like me, you can do this with a stand mixer, but be sure to use the tools for bread dough. This dough is going to be really sticky and it is supposed to be. If it feels really too wet, try adding a little bit of flour, but remember it’s the kneading that is going to make it not sticky.
This first kneading is most important for the dough to rise correctly : take your time if you are doing it by hands, and even with a mixer, don’t just stop when things are mixed together. The dough you want to obtain is even looking, soft, not sticky and stretchy.
When you’re done you can set your dough on a tray or in a big bowl and then cover it with a dishcloth or cling film to keep it from drying out while it proofs. Let it wait at room temperature to rise, for a hour.
After an hour or a bit more, it should have doubled in size. Now, do not punch this loaf, or slam it onto your table, be gentle with it. Rather, clear everything away from your counter top/table and lightly flour the surface. Set your dough on the surface gently.
Now it’s time to shape it into a circle by lightly patting and spinning it around on the floured surface. Then lightly rolling it on the surface with your hands so it keeps a round shape. Again, be very gentle. Then stretch the gluten in the dough, by taking a side of the dough, tugging on it slowly, stretching it, and then fold the dough back in on itself. Continue doing to by going in a cirle, to keep a round shape.
You’re going to keep doing this until the dough starts to tighten up and be harder to stretch. Now flip it over and start smoothing it into a perfect round (or a oval) by gently lifting and rotating it, tucking the excess dough from the sides into the base.
Then take your baking sheet tray and dust it with flour. Put the dough on it, cover it and leave it on your tray to rise for another hour or a bit more.
Preheat your oven to 180-200 degrees Celsius (or 400 degrees F or gas mark 6). While the oven is preheating, put the oven-proof dish on the bottom rack with about a mug of water in it.
Right before you throw your loaf in the now heated oven, take a sharp knife and cut an X shape or 3 slices (not deep!) into your bread. This will help the bread to cook through thoroughly, but also helps it to rise. Then slide it into the top shelf of your oven.
Shut the oven door and bake your loaf for about 25-30 minute. Check on it to make sure the top isn’t burning. To check that it’s done, flip it over and tap the base. You should get a nice hollow sound. If it’s not done, leave it upside down and throw it back in the oven for five more mins. I actually alwyas do this. When you’re satisfied that it’s done, pull it out and leave it to sit until cooled completely. DO NOT cut it open or eat it right away. Leave it be, and let it continue cooking inside the crust. Usually about 20-30 minutes.
Now you can eat it that same day and in the few days following, or cut it and freeze it for longer conservation
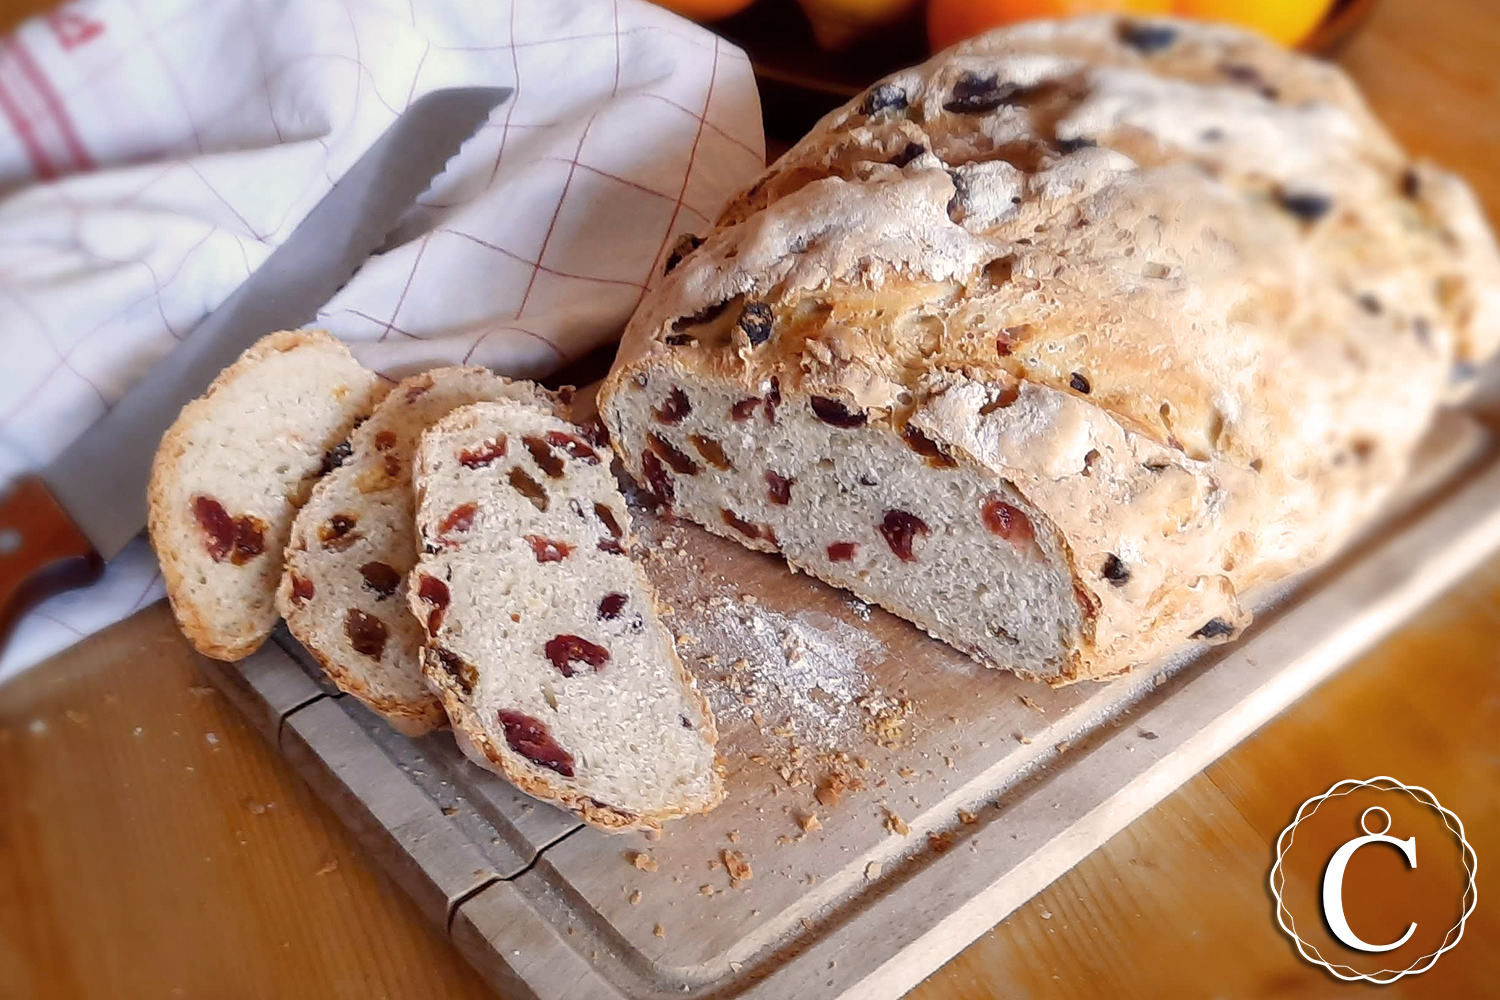
Here is the one I made with cranberries and raisins.


French
Ingrédients
- Farine ordinaire (vous la mesurerez avec le mug ci-dessous)
- 1 sachet de levure sèche de boulanger
- Sel
- Eau
- Si vous en avez envie : noix, graines, ou fruits secs
Outils
- 1 grand bol pour mélanger
- 1 mug (tasse haute) ordinaire
- 1 plat allant au four
- assurez-vous que votre four dispose d’une plaque de cuisson + une autre ou d’une grille (il faudra y mettre le pain et le plat)
Temps total de préparation et de cuisson : 2 heures 45 minutes.
Rassemblez tous les ingrédients, le mug et le bol. Remplissez votre mug de farine, sans la tasser, mais en la remplissant naturellement. Mettez cette farine dans votre grand bol, puis un autre mug de farine, puis seulement un demi-mug. Vous devez avoir 2 mugs et ½ de farine.
Ajoutez ensuite votre levure sèche de boulanger directement dans la farine . Les instructions sur l’emballage ne sont pas nécessaires. Ensuite, mettez du sel au fond de votre mug, juste assez pour couvrir le fond (moins d’une demi-cuillère à café pour un mug normal). Jettez-le aussi dans le bol et mélangez le tout avec vos doigts.
Ensuite, remplissez une fois votre mug d’eau légèrement chaude (PAS bouillante !) et versez-la dans le mélange. Vous avez maintenant un ratio de 2 ½ ingrédients secs + 1 mug d’eau : le ratio parfait pour votre pâte. Si vous le souhaitez, vous pouvez maintenant ajouter d’autres ingrédients comme des graines, des noix ou des fruits secs.
Ensuite, commencez à mélanger la préparation avec vos mains. Si vous êtes flemmard comme moi, vous pouvez le faire avec un mixeur, mais assurez-vous d’utiliser les outils faits pour la pâte à pain. Cette pâte sera vraiment collante et elle est censée l’être. Si elle est vraiment trop humide, essayez d’ajouter un peu de farine, mais n’oubliez pas : c’est le pétrissage qui la rendra moins collante.
Ce premier pétrissage est le plus important pour que la pâte lève correctement : prenez votre temps si vous le faites à la main, et même avec un batteur, ne vous arrêtez pas quand les choses sont juste mélangées. La pâte que vous voulez obtenir est homogène, souple, non collante et élastique.
Lorsque vous avez terminé, vous pouvez déposer votre pâte sur une plaque ou dans un grand bol, puis la recouvrir d’un torchon ou d’un film plastique pour l’empêcher de sécher pendant qu’elle lève. Laissez la pâte lever à température ambiante pendant une heure.
Au bout d’une heure ou un peu plus, elle devrait avoir doublé de volume. Maintenant, ne mette pas votre point dans ce pain, ne le faites pas tomber brutalement sur votre table, allez-y tout doux. Enlevez plutôt tout ce qui se trouve sur votre comptoir/table et farinez légèrement la surface. Posez votre pâte sur la surface en douceur.
Il est maintenant temps de la façonner en cercle en la tapotant légèrement et en la faisant tourner sur la surface farinée. Ensuite, roulez légèrement la pâte sur la surface avec vos mains pour qu’elle garde une forme ronde. Encore une fois, allez-y doucement. Étirez ensuite le gluten dans la pâte, en prenant un côté de la pâte, en tirant dessus lentement, en l’étirant, puis en repliant la pâte sur elle-même. Continuez à le faire en faisant un cercle, pour garder une forme ronde.
Vous allez continuer jusqu’à ce que la pâte commence à se resserrer et à être plus difficile à étirer. Retournez-la et commencez à l’étaler en un rond (ou un ovale) en la soulevant et en la tournant doucement, en repliant l’excédent de pâte des côtés vers la base.
Prenez ensuite votre plaque de four et saupoudrez-la de farine. Posez la pâte dessus, couvrez-la et laissez-la lever sur votre plaque pendant encore une heure ou un peu plus.
Préchauffez votre four à 180-200 degrés Celsius (ou 400 degrés F ou gaz marque 6). Pendant que le four préchauffe, posez le plat allant au four sur la grille inférieure avec environ un mug d’eau dedans.
Juste avant de mettre votre pain dans le four maintenant chauffé, prenez un couteau aiguisé et coupez un X ou 3 rayures (pas profondes !) dans votre pain. Cela aidera le pain à bien cuire, mais aussi à lever. Glissez la plaque ensuite dans votre four, au-dessus du plat qui contient l’eau.
Fermez la porte du four et faites cuire votre pain pendant environ 25-30 minutes. Vérifiez que le dessus du pain ne brûle pas. Pour vérifier qu’il est cuit, retournez-le et tapez sur la base. Vous devriez obtenir un joli son creux. Si le pain n’est pas cuit, laissez-le à l’envers et remettez-le au four pendant cinq minutes de plus. En fait, je le fais à chaque fois. Quand vous êtes sûr que c’est cuit, retirez votre pain, et laissez-le reposer jusqu’à ce qu’il soit complètement refroidi. Ne le coupez pas et ne le mangez pas tout de suite. Laissez-le continuer à cuire à l’intérieur de la croûte, pour en général 20 à 30 minutes.
Vous pouvez manger votre pain le jour même et les jours suivants, ou le couper et le congeler pour une conservation plus longue.
En photo : celui que j’ai fait avec des raisins secs et des cranberries

Un commentaire Ajouter un commentaire